🪝 Vue 3 + TypeScript 项目搭建
# Vue 3 创建项目
vue create project-name
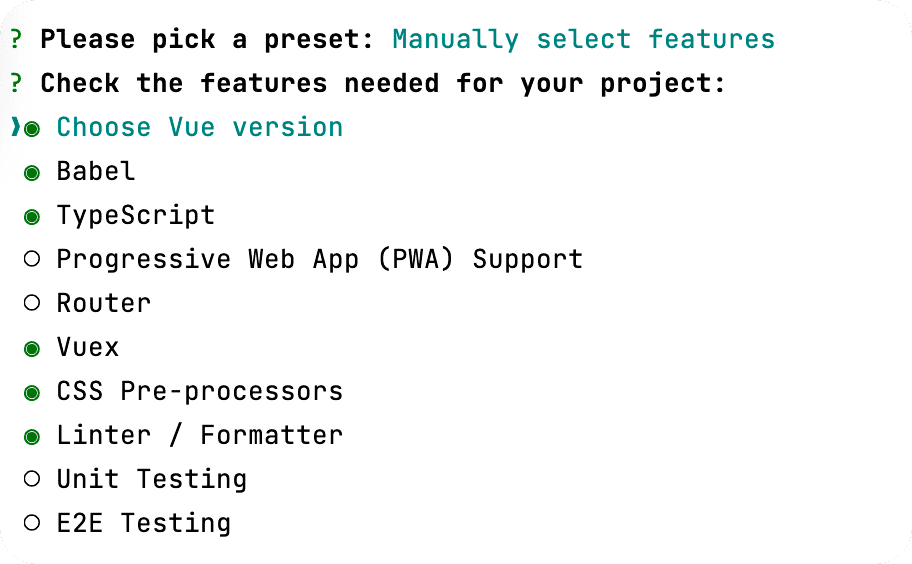
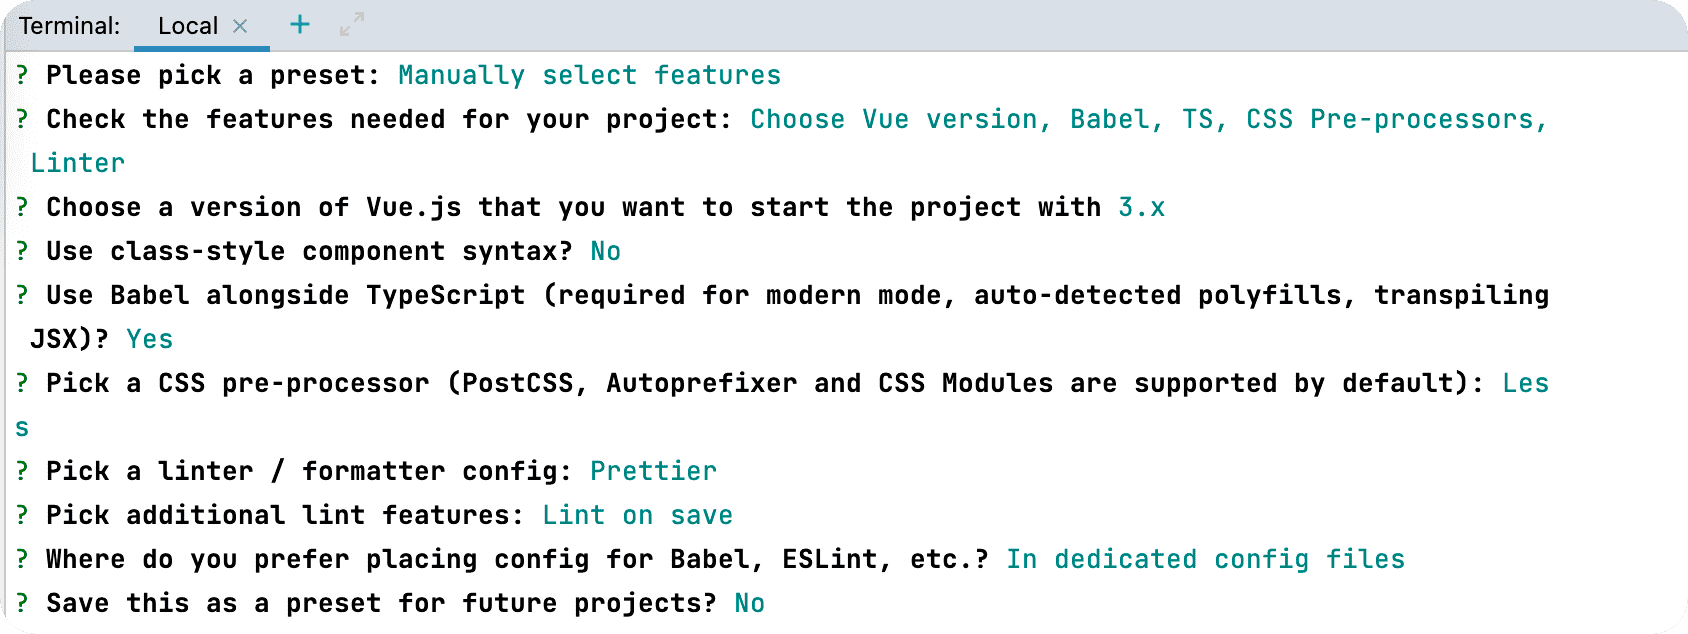
创建 Vue 脚手架时选择的 featue:
- Babel
- TypeScript
- Vuex
- CSS 预处理器
- 语法检查
# 代码规范
# .editorconfig 配置
EditorConfig 有助于为不同 IDE 编辑器上处理同一项目的多个开发人员维护一致的编码风格。
# http://editorconfig.org

root = true

[*] # 表示所有文件适用
charset = utf-8 # 设置文件字符集为 utf-8
indent_style = space # 缩进风格(tab | space)
indent_size = 2 # 缩进大小
end_of_line = lf # 控制换行类型(lf | cr | crlf)
trim_trailing_whitespace = true # 去除行首的任意空白字符
insert_final_newline = true # 始终在文件末尾插入一个新行

[*.md] # 表示仅 md 文件适用以下规则
max_line_length = off
trim_trailing_whitespace = false
2
3
4
5
6
7
8
9
10
11
12
13
14
15
# Prettier 工具
Prettier 是一款强大的代码格式化工具,支持 JavaScript、TypeScript、CSS、SCSS、Less、JSX、Angular、Vue、GraphQL、JSON、Markdown 等语言,基本上前端能用到的文件格式它都可以搞定,是当下最流行的代码格式化工具。
- 安装 prettier
npm install prettier -D
配置
.prettierrc文件:useTabs:使用 tab 缩进还是空格缩进,选择 false;tabWidth:tab 是空格的情况下,是几个空格,选择 2 个;printWidth:当行字符的长度,推荐 80,也有人喜欢 100 或者 120;singleQuote:使用单引号还是双引号,选择true,使用单引号;trailingComma:在多行输入的尾逗号是否添加,设置为none;semi:语句末尾是否要加分号,默认值true,选择false表示不加;
{
  "useTabs": false,
  "tabWidth": 2,
  "printWidth": 80,
  "singleQuote": true,
  "trailingComma": "none",
  "semi": false
}
2
3
4
5
6
7
8
- 创建
.prettierignore忽略文件:
/dist/*
.local
.output.js
/node_modules/**

**/*.svg
**/*.sh

/public/*
2
3
4
5
6
7
8
9
测试 prettier 是否生效
测试一:在代码中保存代码;
测试二:配置一次性修改的命令;
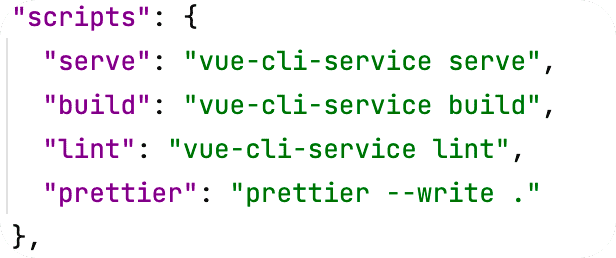
在 package.json 中配置一个 scripts :
"prettier": "prettier --write ."
# 使用 ESLint 检测代码规范
在前面创建项目的时候,就选择了 ESLint ,所以 Vue 会默认帮助我们配置需要的 ESLint 环境。
- 解决 eslint 和 prettier 冲突的问题:
- 安装插件:(vue 在创建项目时,如果选择 prettier + ESlint,那么这两个插件会自动安装)
npm i eslint-plugin-prettier eslint-config-prettier -D
在 eslintrc.js 中添加 prettier 插件:
  extends: [
    "plugin:vue/vue3-essential",
    "eslint:recommended",
    "@vue/typescript/recommended",
    "@vue/prettier",
    "@vue/prettier/@typescript-eslint",
    'plugin:prettier/recommended' // 添加
  ],
2
3
4
5
6
7
8
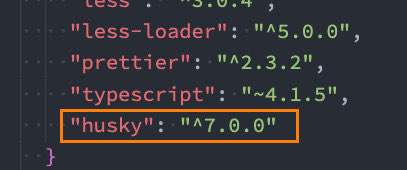
# Before commit 代码规范 /husky 使用
虽然我们已经要求项目使用 eslint 了,但是不能保证组员提交代码之前都将 eslint 中的问题解决掉了:
也就是我们希望保证代码仓库中的代码都是符合 eslint 规范的;
那么我们需要在组员执行
git commit命令的时候对其进行校验,如果不符合 eslint 规范,那么自动通过规范进行修复;
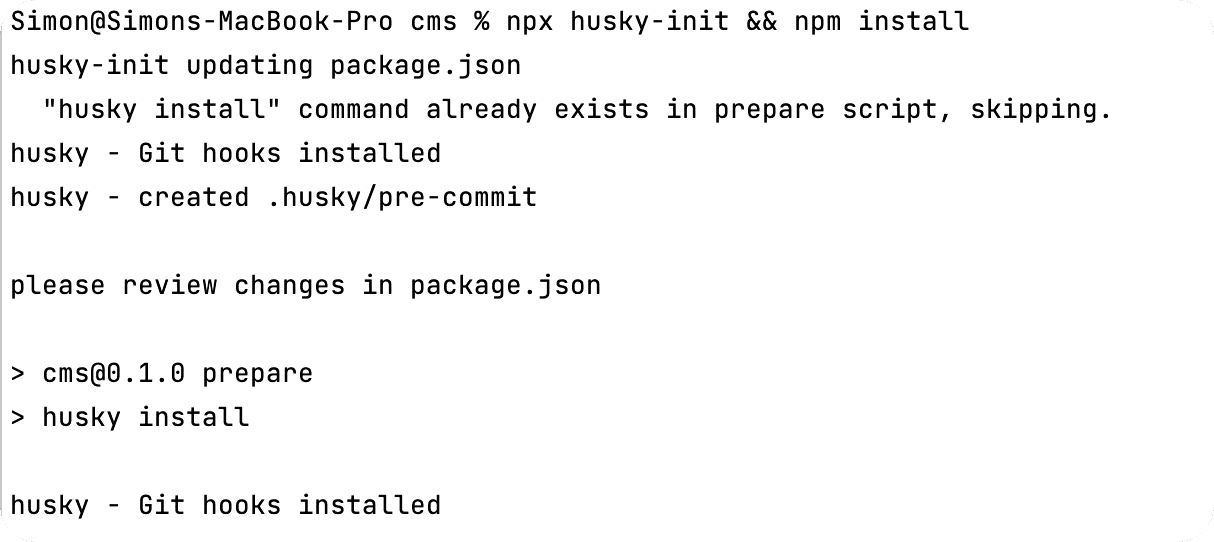
那么如何做到这一点呢?可以通过 Husky 工具:
- husky 是一个 git hook 工具,可以帮助我们触发 git 提交的各个阶段:pre-commit、commit-msg、pre-push。
这里我们可以使用自动配置命令:
npx husky-init && npm install
点击查看
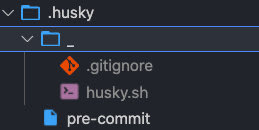
这里会做三件事:
- 安装 husky 相关的依赖:
- 在项目目录下创建
.husky文件夹:
npx huksy install
- 在 package.json 中添加一个脚本:

接下来,我们需要去完成一个操作:在进行 commit 时,执行 lint 脚本:
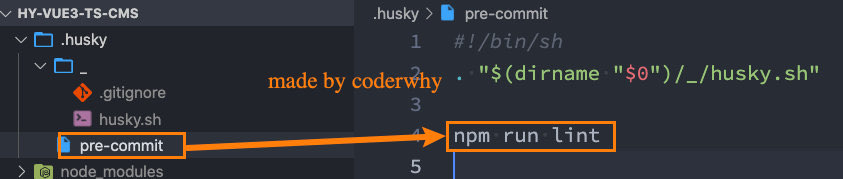
这个时候我们执行 git commit 的时候会自动对代码进行 lint 校验。
# Git Commit 规范
# 代码提交风格
通常我们的 git commit 会按照统一的风格来提交,这样可以快速定位每次提交的内容,方便之后对版本进行控制。
但是如果每次手动来编写这些是比较麻烦的事情,可以使用一个工具:Commitizen(Commitizen 是一个帮助我们编写规范 commit message 的工具)。
安装 Commitizen
npm install commitizen -D1安装 cz-conventional-changelog,并且初始化 cz-conventional-changelog:
npx commitizen init cz-conventional-changelog --save-dev --save-exact1这个命令会帮助我们安装 cz-conventional-changelog:

并且在
package.json中进行配置:"config": { "commitizen": { "path": "./node_mudules/cz-conventional-changelog" } }1
2
3
4
5
配置完 Commitizen 后,提交代码需要使用 npx cz:
- 选择 type:
| Type | 作用 |
|---|---|
| feat | 新增特性 (feature) |
| fix | 修复 Bug (bug fix) |
| docs | 修改文档 (documentation) |
| style | 代码格式修改 (white-space, formatting, missing semi colons, etc) |
| refactor | 代码重构 (refactor) |
| perf | 改善性能 (A code change that improves performance) |
| test | 测试 (when adding missing tests) |
| build | 变更项目构建或外部依赖(例如 scopes: webpack、gulp、npm 等) |
| ci | 更改持续集成软件的配置文件和 package 中的 scripts 命令,例如 scopes: Travis, Circle 等 |
| chore | 变更构建流程或辅助工具 (比如更改测试环境) |
| revert | 代码回退 |
点击查看
- 第二步选择本次修改的范围(作用域)

- 第三步选择提交的信息

- 第四步提交详细的描述信息

- 第五步是否是一次重大的更改

- 第六步是否影响某个 open issue

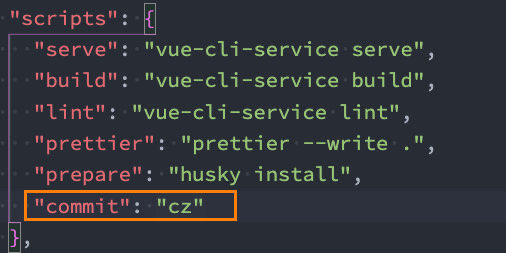
我们也可以在 scripts 中构建一个命令来执行 cz:
# 代码提交验证
如果我们按照 cz 来规范了提交风格,但是依然有同事通过 git commit 按照不规范的格式提交应该怎么办呢?
- 我们可以通过 commitlint 来限制提交;
安装 @commitlint/config-conventional 和 @commitlint/cli
npm i @commitlint/config-conventional @commitlint/cli -D
在根目录创建 commitlint.config.js 文件,配置 commitlint
module.exports = {
  extends: ['@commitlint/config-conventional']
}
2
3
使用 husky 生成 commit-msg 文件,验证提交信息:
npx husky add .husky/commit-msg "npx --no-install commitlint --edit $1"
(拦截提交)
# 第三方库集成
# vue.config.js 配置
vue.config.js 有三种配置方式:
- 方式一:直接通过 CLI 提供给我们的选项来配置:
- 比如 publicPath:配置应用程序部署的子目录(默认是
/,相当于部署在https://www.my-app.com/); - 比如 outputDir:修改输出的文件夹;
- 比如 publicPath:配置应用程序部署的子目录(默认是
- 方式二:通过 configureWebpack 修改 webpack 的配置:
- 可以是一个对象,直接会被合并;
- 可以是一个函数,会接收一个 config,可以通过 config 来修改配置;
- 方式三:通过 chainWebpack 修改 webpack 的配置:
- 是一个函数,会接收一个基于 webpack-chain (opens new window) 的 config 对象,可以对配置进行修改;
# vue-router 集成
安装 vue-router 的最新版本:
npm install vue-router@next
创建 router 对象( router/main.js ):
import { createRouter, createWebHashHistory } from 'vue-router'
import { RouteRecordRaw } from 'vue-router' // 约束routes的类型

const routes: RouteRecordRaw[] = [
  {
    path: '/',
    redirect: '/main'
  },
  {
    path: '/main',
    component: () => import('../views/main/main.vue')
  },
  {
    path: '/login',
    component: () => import('../views/login/login.vue')
  }
]

const router = createRouter({
  routes,
  history: createWebHashHistory()
})

export default router
2
3
4
5
6
7
8
9
10
11
12
13
14
15
16
17
18
19
20
21
22
23
24
安装 router( main.ts ):
import router from './router'

createApp(App).use(router).mount('#app')
2
3
在 App.vue 中配置跳转:
<template>
  <div id="app">
    <router-link to="/login">登录</router-link>
    <router-link to="/main">首页</router-link>
    <router-view></router-view>
  </div>
</template>
2
3
4
5
6
7
# vuex 集成
安装最新版 vuex:
npm install vuex@next
创建 store 对象:
import { createStore } from 'vuex'

const store = createStore({
  state() {
    return {
      name: 'coderwhy'
    }
  }
})

export default store
2
3
4
5
6
7
8
9
10
11
安装 store:
createApp(App).use(router).use(store).mount('#app')
在 App.vue 中使用:
<h2>{{ $store.state.name }}</h2>
# element-plus 集成
Element Plus,桌面端组件库
- 相信很多同学在 Vue2 中都使用过 element-ui,而 element-plus 正是 element-ui 针对于 Vue3 开发的一个 UI 组件库;
- 它的使用方式和很多其他的组件库是一样的,所以学会 element-plus,其他类似于 ant-design-vue、NaiveUI、VantUI 都是差不多的;
安装 element-plus
$ npm install element-plus
# 全局引入
一种引入 element-plus 的方式是全局引入,代表的含义是所有的组件和插件都会被自动注册:
import ElementPlus from 'element-plus'
import 'element-plus/lib/theme-chalk/index.css'

import router from './router'
import store from './store'

createApp(App).use(router).use(store).use(ElementPlus).mount('#app')
2
3
4
5
6
7
# 局部引入
使用 unplugin-vue-components 实现按需引入:
- 安装
unplugin-vue-components:
npm i unplugin-vue-components unplugin-auto-import -D
vue.config.js(这里是 Vue-CLI s 配置方法,其他脚手架需要参考文档)const AutoImport = require('unplugin-auto-import/webpack') const Components = require('unplugin-vue-components/webpack') const { ElementPlusResolver } = require('unplugin-vue-components/resolvers') module.exports = { configureWebpack: { plugins: [ AutoImport({ resolvers: [ElementPlusResolver()], }), Components({ resolvers: [ElementPlusResolver()], }), ], } }1
2
3
4
5
6
7
8
9
10
11
12
13
14
15
16然后在
main.ts全局注册组件:import { ElButton, ElTable, ElAlert, ElAside, ElAutocomplete, ElAvatar, ElBacktop, ElBadge, } from 'element-plus' import 'element-plus/dist/index.css' const app = createApp(App) const components = [ ElButton, ElTable, ElAlert, ElAside, ElAutocomplete, ElAvatar, ElBacktop, ElBadge ] for (const cpn of components) { app.component(cpn.name, cpn) }1
2
3
4
5
6
7
8
9
10
11
12
13
14
15
16
17
18
19
20
21
22
23
24
25
26
27
28
from: 实现自动引入 + 按需引入 element-plus 原来如此简单 - SegmentFault 思否 (opens new window)
(在非 <template> 中使用组件仍然需要手动引入)
(最新引入还是得看官方文档,特别是引入 CSS 包,一旦找不到样式就没有效果。找 bug 都快怀疑人生了)
点击查看
- 安装
webpack-bundle-analyzer看打包信息:
$ npm install --save-dev webpack-bundle-analyzer
npm run build --report
不用做任何配置,就可以看到终端打印出来打包后各文件大小。
如果想看详细的打包后文件的信息,可以在 vue.config.js 中做如下配置:
const BundleAnalyzerPlugin = require('webpack-bundle-analyzer').BundleAnalyzerPlugin;

module.exports = {
    configureWebpack: {
        plugins: [
            new BundleAnalyzerPlugin()
        ]
    }
}
2
3
4
5
6
7
8
9
然后打开地址 http://127.0.0.1:8888 就可以了。
据我个人测试,完整引入时,打包后 chunk.js 文件大小为 400k 左右。按需引入后,打包后 chunk.js 文件大小为 200k 左右。
附加内容:Vue-CLI 环境变量
# axios 集成
安装 axios:
npm install axios
封装 axios:
import axios, { AxiosInstance, AxiosRequestConfig, AxiosResponse } from 'axios'
import { Result } from './types'
import { useUserStore } from '/@/store/modules/user'

class HYRequest {
  private instance: AxiosInstance

  private readonly options: AxiosRequestConfig

  constructor(options: AxiosRequestConfig) {
    this.options = options
    this.instance = axios.create(options)

    this.instance.interceptors.request.use(
      (config) => {
        const token = useUserStore().getToken
        if (token) {
          config.headers.Authorization = `Bearer ${token}`
        }
        return config
      },
      (err) => {
        return err
      }
    )

    this.instance.interceptors.response.use(
      (res) => {
        // 拦截响应的数据
        if (res.data.code === 0) {
          return res.data.data
        }
        return res.data
      },
      (err) => {
        return err
      }
    )
  }

  request<T = any>(config: AxiosRequestConfig): Promise<T> {
    return new Promise((resolve, reject) => {
      this.instance
        .request<any, AxiosResponse<Result<T>>>(config)
        .then((res) => {
          resolve((res as unknown) as Promise<T>)
        })
        .catch((err) => {
          reject(err)
        })
    })
  }

  get<T = any>(config: AxiosRequestConfig): Promise<T> {
    return this.request({ ...config, method: 'GET' })
  }

  post<T = any>(config: AxiosRequestConfig): Promise<T> {
    return this.request({ ...config, method: 'POST' })
  }

  patch<T = any>(config: AxiosRequestConfig): Promise<T> {
    return this.request({ ...config, method: 'PATCH' })
  }

  delete<T = any>(config: AxiosRequestConfig): Promise<T> {
    return this.request({ ...config, method: 'DELETE' })
  }
}

export default HYRequest
2
3
4
5
6
7
8
9
10
11
12
13
14
15
16
17
18
19
20
21
22
23
24
25
26
27
28
29
30
31
32
33
34
35
36
37
38
39
40
41
42
43
44
45
46
47
48
49
50
51
52
53
54
55
56
57
58
59
60
61
62
63
64
65
66
67
68
69
70
71
# tsconfig.json
tsconfig.json・TypeScript 中文网・TypeScript——JavaScript 的超集 (tslang.cn) (opens new window)
{
  // 编译配置
  "compilerOptions": {
    // 目标代码
    "target": "esnext",
    // 目标代码要使用的模块化方案
    "module": "esnext",
    // 开启严格模式
    "strict": true,
    // jsx进行怎样的处理
    "jsx": "preserve",
    // 辅助导入功能
    "importHelpers": true,
    // 按照node解析模块
    "moduleResolution": "node",
    // 跳过一些第三方库的类型监测(axios/loadash)
    "skipLibCheck": true,
    // esModule和commonJS混合使用
    // export defalt / module.exports = {}
    "esModuleInterop": true,
    "allowSyntheticDefaultImports": true,
    // 生成映射文件 (ts=>js)
    "sourceMap": true,
		// 文件路径解析时基本路径
    "baseUrl": ".",
    // 指定具体要解析使用的类型 webpack
    "types": ["webpack-env"],
    // 路径解析匹配(类似webpack alias)
    "paths": {
      "@/*": ["src/*"]
    },
    // 可以指定在项目中可以使用哪些库的类型(Proxy/window/Document)
    "lib": ["esnext", "dom", "dom.iterable", "scripthost"]
  },
  // 要解析的文件后缀名
  "include": [
    "src/**/*.ts",
    "src/**/*.tsx",
    "src/**/*.vue",
    "tests/**/*.ts",
    "tests/**/*.tsx"
  ],
  // 排除的文件
  "exclude": ["node_modules"]
}
2
3
4
5
6
7
8
9
10
11
12
13
14
15
16
17
18
19
20
21
22
23
24
25
26
27
28
29
30
31
32
33
34
35
36
37
38
39
40
41
42
43
44
45
# shims-vue.d.ts
类型声明:
/* eslint-disable */
declare module '*.vue' {
  import type { DefineComponent } from 'vue'
  const component: DefineComponent<{}, {}, any>
  export default component
}
2
3
4
5
6
规范、限制组件中配置传入的类型。
preps、setup()…。